
This is one of my favourite things to make for gifts, and it doesn't involve any sewing!
Since 'Sew, Mama, Sew' is having a Giveaway Day, I thought I'd join the bandwagon and have one too... except mine includes a tutorial as well
Since 'Sew, Mama, Sew' is having a Giveaway Day, I thought I'd join the bandwagon and have one too... except mine includes a tutorial as well
Materials:

1 x notebook/journal (I'm using a retro notebook bought from a thrift store)
fabric to fit notebook
batting to cover notebook (polyfill)
1 x multi purpose glue (UHU)
1 x A4-sized paper (coloured or patterned - the size of the paper actually depends on the size of your book)
scissors, marking pen (air-erasable)
acrylique stencil paint, stencil design & stencil brush (all optional)


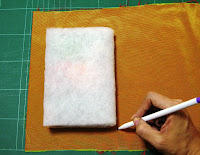
Cut a large enough sheet of the batting to cover the notebook. Allow about 0.25" to extend out from the edges of the book.


Put glue along the edges and fold the batting over and on the book.

Do this for the other side as well. Trim any access batting.

Place the book on the fabric and mark out the corners as a guide for the stencil placement.


Cut out the stencil - I've printed a pattern on manila card.
You can also use a ready-made one.

Some examples of home-made stencils (on manila card) which have been re-used a number of times and ready-made stencils.


Using the marked guidelines, place the stencil in the centre and hold down with tape.


Fill in with colour. Use the stencil brush and 'stab' the paint on. Do not overload the brush with paint or it will bleed under the stencil.


Wait for the paint to dry before peeling off the stencil.

Test the placement of the motif on the notebook.

Without shifting the fabric, open the book and let the fabric lay on the table. Put glue along the side edge of the inner cover ONLY.

Fold the fabric over and paste down. Let it dry.


Do the same for the other side.

Make 2 cuts on the fabric down from the spine of the book. Stop the cut just at the batting line.

Put glue on the bottom edge of the inner cover.


Fold the fabric over and paste down. Use a pointy tool like an awl to hold down the inner fabric while folding over. Let dry.

Repeat on all 3 remaining sides.


Fold in, and under, the excess fabric at the corners. Paste down the corners with glue.


Tuck the strip of fabric at the spine into the hollow between the bound pages and the hard cover.


Squeeze glue in there and close the book to let it set.

To cover the mess on the inside, cut the A4-sized paper into 2. I've printed the same motif to carry the design on the inside as well.

Trim the paper to fit.

Put glue on the back of the paper.

Fit it to the first page and paste down on that side first.


Make a crease down the centre with your fingernail and paste down on the hard cover side. Repeat same for the inner back cover.
At this point, the project is basically done.


You can continue to embellish your cover design if you wish. I've used relief paint to 'draw' out the leaves which were earlier omitted.


1 x notebook/journal (I'm using a retro notebook bought from a thrift store)
fabric to fit notebook
batting to cover notebook (polyfill)
1 x multi purpose glue (UHU)
1 x A4-sized paper (coloured or patterned - the size of the paper actually depends on the size of your book)
scissors, marking pen (air-erasable)
acrylique stencil paint, stencil design & stencil brush (all optional)


Cut a large enough sheet of the batting to cover the notebook. Allow about 0.25" to extend out from the edges of the book.


Put glue along the edges and fold the batting over and on the book.

Do this for the other side as well. Trim any access batting.


Place the book on the fabric and mark out the corners as a guide for the stencil placement.


Cut out the stencil - I've printed a pattern on manila card.
You can also use a ready-made one.

Some examples of home-made stencils (on manila card) which have been re-used a number of times and ready-made stencils.


Using the marked guidelines, place the stencil in the centre and hold down with tape.


Fill in with colour. Use the stencil brush and 'stab' the paint on. Do not overload the brush with paint or it will bleed under the stencil.


Wait for the paint to dry before peeling off the stencil.

Test the placement of the motif on the notebook.

Without shifting the fabric, open the book and let the fabric lay on the table. Put glue along the side edge of the inner cover ONLY.

Fold the fabric over and paste down. Let it dry.


Do the same for the other side.

Make 2 cuts on the fabric down from the spine of the book. Stop the cut just at the batting line.

Put glue on the bottom edge of the inner cover.


Fold the fabric over and paste down. Use a pointy tool like an awl to hold down the inner fabric while folding over. Let dry.

Repeat on all 3 remaining sides.


Fold in, and under, the excess fabric at the corners. Paste down the corners with glue.


Tuck the strip of fabric at the spine into the hollow between the bound pages and the hard cover.


Squeeze glue in there and close the book to let it set.

To cover the mess on the inside, cut the A4-sized paper into 2. I've printed the same motif to carry the design on the inside as well.

Trim the paper to fit.

Put glue on the back of the paper.

Fit it to the first page and paste down on that side first.


Make a crease down the centre with your fingernail and paste down on the hard cover side. Repeat same for the inner back cover.
At this point, the project is basically done.


You can continue to embellish your cover design if you wish. I've used relief paint to 'draw' out the leaves which were earlier omitted.

The completed journal.
I'd love to hear what you think of this tutorial :)
For a chance to win this very same fabric-bound journal, just leave a comment here or create a link to your own blog or other online pages. I am happy to ship internationally (free) so just jump right in!
Last day to enter is May 31 and the winner by random drawing will be announced on June 1st.
Thanks for looking!
 **At the point of writing footnote, it is 9.54 am, 1 June 2009. The contest is officially closed, but I will accept the last few entries that came in the early morning hours because I realize the time difference was not made known :)
Results out shortly!
For a chance to win this very same fabric-bound journal, just leave a comment here or create a link to your own blog or other online pages. I am happy to ship internationally (free) so just jump right in!
Last day to enter is May 31 and the winner by random drawing will be announced on June 1st.
Thanks for looking!
**At the point of writing footnote, it is 9.54 am, 1 June 2009. The contest is officially closed, but I will accept the last few entries that came in the early morning hours because I realize the time difference was not made known :)Results out shortly!
Hey....... me, too. Both for the bandwagon and the UHU glue. You gave me one of these way back when E was born - lovely! So you can exempt me from this giveaway. I just wanted to comment to say the stencil embellishment on this one is gorgeous, so lucky whoever wins this! Also wanted to say it is a very good tutorial and I love all these recent tutorials you've been posting. You want another handmade bag? Come over and enter (or exempt yourself from) my giveaway, too!
ReplyDeletexoxox
L
Thanks for the great tutorial. So if I don't win this journal I will know how to cover one myself! lol
ReplyDeleteSwedie
Very well explained tutorial! Good job adding the pics along with it.
ReplyDeleteAwesome tutorial and I love the journal, thank you!!!
ReplyDeleteSo generous -i haven't seen a tutorial in a giveaway yet!
ReplyDeleteWow! this is such a great tutorial! Thanks so much for sharing! I've always wanted to try something like this but never knew how to! Thank you for the giveaway opportunity!
ReplyDeleteGreat tutorial!
ReplyDeletehey I want to win but NOW can make my own but PLEASE let me win
ReplyDeletegreat tuorial & giveaway! thanks!
ReplyDeleteThat's awesome, thanks!! I'd love to have that!
ReplyDeletepattywolffe@gmail.com
Great tutorial. Thanks!
ReplyDeleteIt is like everyone is a winner with the tutorial!
ReplyDeleteGreat tutorial - thank you!
ReplyDeleteI love the fabric and design you chose for that journal.
heidig@gmail.com
Wow, this is gorgeous. I'm very impressed with your stencil cutting skills too :)
ReplyDeleteCool! Thanks for the tutorial too! What a great handmade gift idea!
ReplyDeleteThanks for doing the giveaway!
Cassie Driver
cmdoduck(at)gmail(dot)com
Adorable! I love it! and a tutorial as well,you rock!
ReplyDeleteJloMamaJama@aol.com
Very cool idea! I would love to win it!
ReplyDeleteThanks for the great giveaway, if I am the lucky winner, you can contact me through my website www.radseams.com.
cute! easy to understand instructions, too.
ReplyDeletewww.mpaisley.etsy.com
You are SO AMAZING. Thanks for the tutorial, this is great. I think I will attempt one of my own.. but only if I don't win ;)
ReplyDeleteNice tutorial. I would love to win this book though!
ReplyDeleteI just started learning to book bind, so this tutorial is great! And the boo you've made it gorgeous!
ReplyDeleteI'm jumping in :) Please pick me :) Thank you !
ReplyDeleteThanks for the tutorial! You are so crafty!! Join my giveaway too!
ReplyDeleteThis is fantastic! I can't wait to try it!!! Thank you for the tutorial & giveaway!
ReplyDeleteGreat tutorial. If I don't win, now I know how to make one (or three)
ReplyDeleteIt looks so easy with your tutorial...
ReplyDeleteI can't help thinking that making it myself I would have glue all over my fingers, and ruin the fabric...
(I'm a kind of a two-left-handed person, as we say in french...)
oh wow, what a lovely way to dress up an otherwise plain notebook. :) abby
ReplyDeleteabi-gail7@hotmail.com
what a great way to use up all of those journals i bought for no reason off the dollar rack! thanks for the tutorial!
ReplyDeleteThanks for the great visuals, I'm going to try this myself. Wish you had 'followers' on your blog, I'd like to follow you work.
ReplyDeleteGreat tutorial!
ReplyDeleteThanks for a chance to win! :)
hootie364@gmail.com
That tutorial was really well done and clearly demonstrated.
ReplyDeleteI'm going to totally be bummed if I don't win this, but I'm glad you posted a tutorial, because I'm needing a new project to try out. I'd rather have the one you made though, since I know mine won't turn out that great.
ReplyDeleteThanks for the giveaway and tute. I can be contacted thru my blog: www.luscofamily.blogspot.com
ReplyDeleteWhat a great tutorial! Also, a beautiful journal, I'd love to win!
ReplyDeleteFantastic tutorial! I love the detail, and the stencil designs! Thanks!
ReplyDeleteWow! A great tutorial! I love that you use batting. It really gives it that "oomphf" lol.
ReplyDeleteAwesome tute. That is really cute (I didn't mean for that to rhyme...sounds cheesy now). Thanks for the giveaway too. That doesn't look too hard either, I love it.
ReplyDeletespondah(at)aol(dot)com
love the tutorials!
ReplyDelete(and the journal!)
Thank you so much for your no-sew tutorial. Yes, I am a quilter, but I always love to learn new techniques. Your instructions are very clear to read.
ReplyDeleteAnd it's so good to meet people around the world through the internet.
kathleen
villagequilteratgmaildotcom
Love the notebook and the tutorial--step by step--makes it easy!! Awesome! Thank you!
ReplyDeleteWhat a great tutorial. I'll have to go and dig up those old journals with the ugly covers!
ReplyDeleteit's lovely!
ReplyDeleteLoved you tutorial...you do very well with those...
ReplyDeleteI would love to win the notebook - it is great!
nhsarab at yahoo do com
I think this is just beautiful. Count me in!
ReplyDeleteWhat a great tutorial. I especially love the stencil! Very nice personal touch.
ReplyDeleteMy!!! What generosity! You share the tutorial and the actual book!!
ReplyDeleteYour tutorial is well-done! The journal is lovely.
ReplyDeleteI love the idea of adding a tutorial, thank you!
ReplyDeletesandyandcosmo(at)yahoo(dot)com
How very lovely of you to add a tutorial. It was super easy to follow and I just love the stencil you used! Thank you!!
ReplyDeleteHugs & Blessings!
Thank you for including the tutorial! I have put your site into my favourites and hope to try it one day ! thanks for taking part in the giveaway.
ReplyDeleteThank you for the tutorial and the giveaway!!
ReplyDeleteIts fantastic! Can't wait to give it a try...but first I'll try my luck:)
Great tutorial and I'll make one even if i win... im adding it to my to do list!! we're having a give away too!!
ReplyDeletexo Steph
Beautiful and thanks for the tutorial!!
ReplyDeleteFantastic! This way, everyone's a winner! I sure would love that book though....
ReplyDeleteWow! What a great giveaway - Thanks! And thanks for the great tutorial!
ReplyDeleteThank you for the tutorial. That was clever knowing your high traffic bloggers were coming. Your work is lovely. THanks for a chance to win.
ReplyDeleteJenny
Krousegirl2@aol.com
What a great giveaway idea. The tutorial is excellent. Thank you!
ReplyDeleteThanks for the great tutorial! I love your stencil, it's gorgeous!
ReplyDeleteThe stencil you used is gorgeous!
ReplyDeletei'm so glad you gave the tute!
ReplyDeletegreat tutorial... love all the pictures, great for a visual learner like me!
ReplyDeletePlease enter me in the draw, and don't forget to enter mine. :)
Wow! So cool. Thanks for the tutorial. It seems easy enough to follow.
ReplyDeleteJodie
jodcoz(at)yahoo(dot)com
Hello from Canada. What an elegant journal - well done!
ReplyDeletePlease count me in for your generous giveaway.
kareno369(@)hotmail(dot)com
What an amazing giveaway & great tutorial. I really enjoyed it, easy to understand. Love all the pictures!
ReplyDeleteWow, this is cool. I love the journal and I love the tutorial. It's cool to see where it came from and how it came to be!
ReplyDeleteGreat tutorial. I'm definitely going to try it!
ReplyDeleteThanks for the chance to win!
Love it! Would love to win it and have a great new craft journal to note my workings from your tutorial! That would be an over the top win!
ReplyDeleteI would love to win this sweet journal. Thanks for the opportunity.
ReplyDeleteReally cute journal! I'm going to have to try that tut. out soon!
ReplyDeleteSo pretty! I'd love to win! Thanks for the chance. If I don't win, I might even be brave enough to try making my own!
ReplyDeleteGreat tutorial! I've bookmarked it.
ReplyDeleteThanks for the chance to enter!
What a lovely idea. Thanks for sharing.
ReplyDeleteWhat a lovely journal--please count me in for the giveaway!
ReplyDeletethe painted pattern on the cover really adds such a unique and beautiful touch! Very creative :)
ReplyDeleteThanks for the great opportunity!
suserat at yahoo dot com
What a great tutorial. Though, yours is much prettier than what I'd slap together! So, I hope I win! I though UHU was just glue sticks... learning things on my blog tour.
ReplyDeleteI thought that was a great tutorial! I liked that you included so many photos. Thanks for offering the chance to win such a pretty journal.
ReplyDeleteThanks for the great tutorial! And for the give-away too :)
ReplyDeleteThanks for the tutorial. I've bookmarked it, and will come back later to browse your site. Ahem, when I'm not entering all these giveaways. ;)
ReplyDeleteGreat to meet you.
This is wonderful - and thanks so much for the tutorial!
ReplyDeleteLovely - great idea for a gift.
ReplyDeleteHey hey! You're on One Pretty Thing today, Jeet! Eeeee! Hip hip hurrah! Love, L
ReplyDelete