It HAS been a while, I know! With orders piling up, a home visit, and Christmas around the corner, I barely had to time to sleep...
Things are still crazy here but I was determined to make this post, and so here it is!
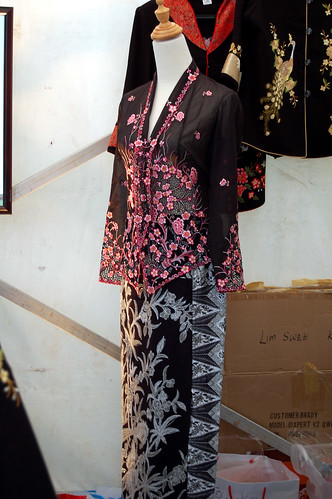
One of the many traditional garbs over here in Malaysia is the sarong kebaya. It is a 2-piece ensemble of a close-fitting embroidered blouse (the kebaya) worn over a batik sarong. There are basicially 3 versions or styles - Malaysian, Indonesian and Peranakan, differing mostly in the length and embroidery design of the kebaya, and the print of the batik of the sarong.

Peranakan style sarong kebaya
My nice Japanese client came to me with pre-embroidered kebaya and sarong cloths. The style of the kebaya cloth was more Malaysian (much longer blouse) than Peranakan, although the print on the sarong was more Peranakan (more flowers less geometric patterns). Well!


embroidery detail for the front 'piece' (click for larger)
One of the many traditional garbs over here in Malaysia is the sarong kebaya. It is a 2-piece ensemble of a close-fitting embroidered blouse (the kebaya) worn over a batik sarong. There are basicially 3 versions or styles - Malaysian, Indonesian and Peranakan, differing mostly in the length and embroidery design of the kebaya, and the print of the batik of the sarong.
Peranakan style sarong kebaya
My nice Japanese client came to me with pre-embroidered kebaya and sarong cloths. The style of the kebaya cloth was more Malaysian (much longer blouse) than Peranakan, although the print on the sarong was more Peranakan (more flowers less geometric patterns). Well!


embroidery detail for the front 'piece' (click for larger)


the sarong (click for larger)
Being rather petite, she wanted the kebaya rather shorter than the embroidery intended it to be, which would result in the bulk of the embroidery (the triangular section) to rise significantly above her waistline, when it should at least stop there. I advised her against this as it would not be a flattering look on her petite frame. So she agreed to have the apex of the embroidery begin at the waistline.

Pattern marked out on right side for accuracy. That piece of loose embroidery on the right side of the picture is the neck/collar piece

Pattern marked out on right side for accuracy. That piece of loose embroidery on the right side of the picture is the neck/collar piece
(click for larger)
And because of her petite-ness, about a third of the embroidered piece was potentially going to be wasted. This would also have the added undesirable consequence that the front embroidery would not coincide nicely with the narrower back embroidery detail (you can see the back piece just to the left and bottom of the picture). In order to avoid all of that, I un-attached the embroidery at that part and cut the pattern on the fabric underneath instead, thus saving the whole piece to be reattached to the back pattern piece after the blouse is made up.

(click for larger)

(click for larger)
That was the main headache solved for the blouse.
The sarong provided its own unique considerations also. Plus the fact that my nice Japanese lady did not want a traditional pleated sarong-styled skirt (with zipper instead of actually wrapped and tied, the way most modern sarongs are worn these days) but a fitted gored skirt with godets...
...which called for very strategic placement of pattern pieces in order to get the most out of the prints on the fabric and ensure a flattering arrangement of the prints.


front (click for larger) back
The triangular inserts are the godet pieces, 6 in total. The front side pieces are so narrow in order to accomodate the broad centre front piece. I did not want to cut into the print and 'spoil' it. The picture for the back was photographed with the front side pieces in order to see the transition from front to back.
The godets were attached first of all, to its right side neighbours,

(click for larger)
which I then treated as one piece when attaching to the next section.In an ideal world, I would have liked to match the prints on each piece as well but there really wasn't enough fabric for that (nor enough patience on my part probably!) . I settled for matching the tiny border pattern instead, you know, to earn my fee :P

(click for larger)

Wow looks and sounds like brain surgery!
ReplyDelete